
Before we talk about Integration of Power BI with Microsoft ecosystem we should understand:
What is Power Bi ecosystem?
The Power BI ecosystem means all the services, tools, and tech that work with and boost what Power BI can do. Power BI is Microsoft’s tool for business analytics. This ecosystem lets companies link their data, make reports and dashboards, and get useful insights from their info.
In addition, this ecosystem includes components that are specific to Power BI itself but also to other Microsoft technologies that interoperate with Power BI, as well as third-party integrations. This interoperability with other Microsoft tools and technologies, together with third-party products, makes Power BI a very strong business intelligence platform whose value exceeds that of other business intelligence tools on the market that are often more siloed.
Integration with Microsoft Ecosystem:
Power BI is the part of Microsoft ecosystem which seamlessly integrates with other Microsoft tools such as Excel, Azure, SQL Server etc. This integration enhances collaboration and facilitates a smooth workflow, particularly for organizations already invested in Microsoft technologies.
1. Power BI –Excel Integration
Power BI and Excel work well together giving users tools to make sense of data and show it in clear ways. You can connect these programs in several important ways:
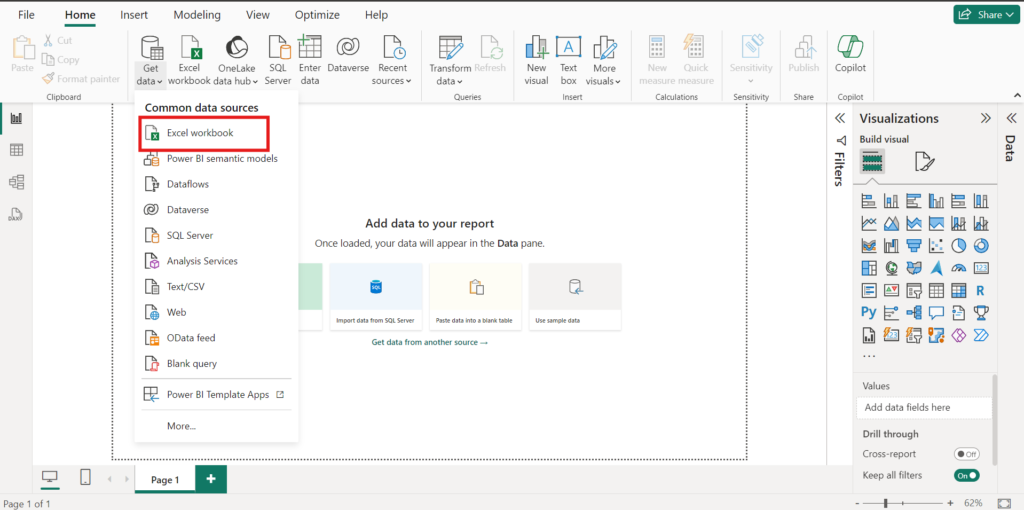
a. Importing Excel Data into Power BI from Power BI Desktop: Power BI makes it simple to bring in data from Excel files. Open Power BI Desktop. Click on Get Data on the Home ribbon. Pick Excel then browse to choose the Excel file you want to bring in.
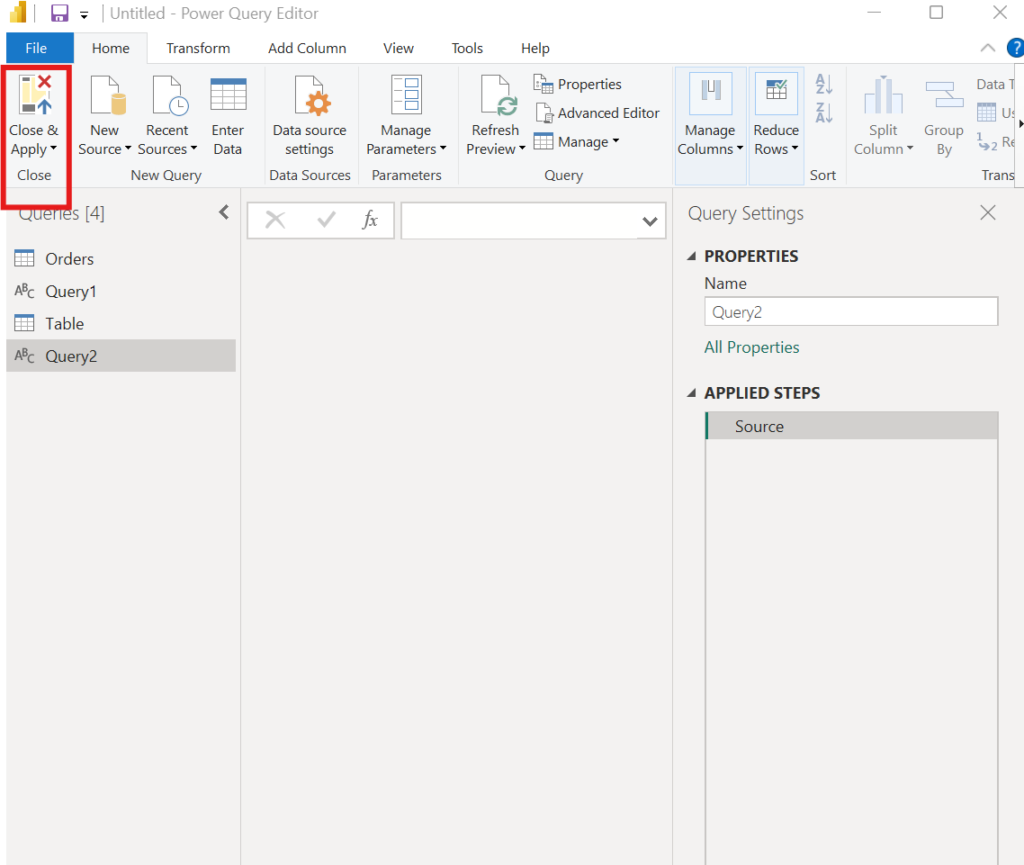
b. By using Power Query Editor: Power Query is a tool used to manipulate data and is commonly used for data analysis and business intelligence. Excel and Power BI both use Power Query to change and load data. You can do similar data changes in both programs, which helps you handle your data across the two platforms.
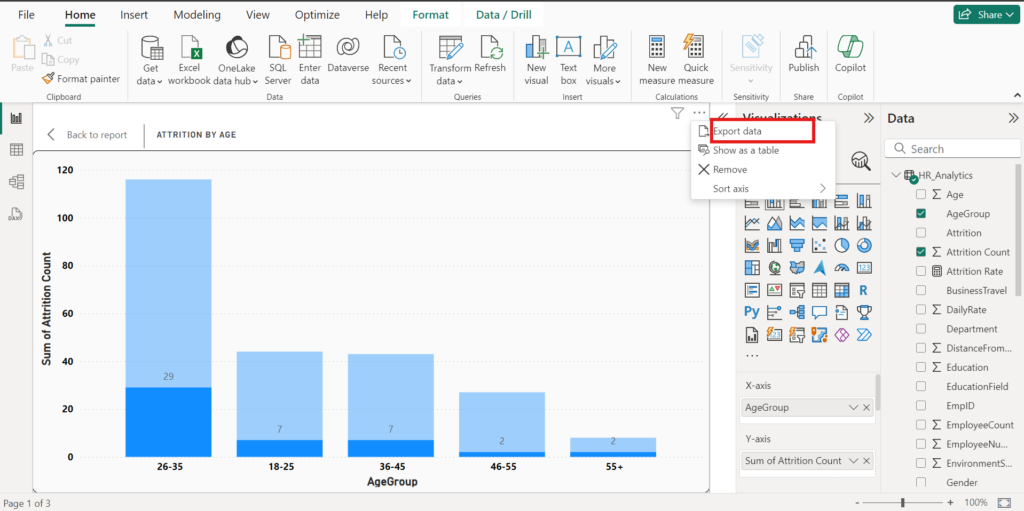
c. Analyzing Power BI Data in Excel Analyze in Excel: This tool lets users link to a Power BI dataset right from Excel. Open Power BI service (web interface). Go to the dataset you plan to use. Click the ‘…’ (ellipsis) next to the dataset, and export data in Excel. Excel will start, and you can make PivotTables or charts based on the dataset.
d. Using Power BI Publisher for Excel : Now we can publish our Excel reports directly from the Excel itself into our Power BI Service with the help of “Power BI Publisher for Excel” that enables users to pin Excel ranges, tables, or charts straight to a Power BI dashboard.
Incase, if you can’t find it in your Excel, just set up the add-in and pick the data or visuals you want to pin then use the Power BI Publisher to add them to your Power BI dashboard.
f. Automatically Updating Data: Excel files can linked to Power BI datasets that allow us to set up automatic data updates. This helps us to keep our reports current (updated) without the need to export data.
g. Gain Insights Using Excel Data in Power BI: Power BI have the features to pull data from our Excel model which opening up possibilities for more intricate visualizations and also analysis tools that go beyond Excel’s standalone capabilities.
2. Power BI –Azure Integration
Azure Power BI is the cloud-based business analytics service designed to visualize and share insights from data. By integrating with a variety of Azure services, Power BI can tap into elastic cloud computing resources to store, process, and analyze data in complex ways. It aids businesses in making decisions based on their data by rendering raw data into meaningful insight, vivid visualization, and seamless connections to cloud services within Azure.
Let us discuss the following topics that remain under the Power BI-Azure integration-
2.1 What is Microsoft Azure?
Microsoft Azure is a cloud computing-based platform and set of services developed by Microsoft. It provides many services that afford business computing power, storage, databases, networking, analytics, and so much more. Everybody can use the services in the course of creating, setting up, and running applications. With Azure, businesses and developers can realize the power of the cloud in running apps and services without managing any hardware and infrastructure on their own.

2.2 Why we need to connect Microsoft azure to power BI?
There exist following advantages that make sure Microsoft Azure with Power BI is the right thing,
• Real-time Data Insight: Azure services — SQL Database, Synapse Analytics, and IoT Hub provide up-to-the-minute data. You can see this data right in Power BI that help you make quick decisions.
• Scalability: The infrastructure of Azure grows with your needs. It deals with big data sets and complex calculations smoothly. Power BI will be able to make use of this in support of analysis and reporting on large amounts of data.
• Advanced Analytics: With the Integration of Azure Machine Learning and Databricks along with Power BI, complex analysis can be done in the area of Trend Predictions and understanding your data better.
• Consolidation of Data: Azure has the ability to consolidate data from a number of different places into one location. Power BI then takes this to construct reporting and dashboards—views of everything in one place.
• Automated Refresh of Data: Azure ensures that your Power BI reports and dashboards are always up-to-date. It refreshes the data.
• Security and Compliance: Enterprise-grade security capabilities within Azure and conformance to industry requirements bring assurance that your data is secure and compliant with relevant regulations.
2.3 How to connect Azure to Power BI?
Steps to Connect Power BI and Azure:
1. Get Ready with Azure Service: You should set up and be able to log in to the Azure service you want to use, like SQL Database or Synapse Analytics.
2. Details for connection: Obtain the server names, database names, and login details that would be used to connect.
3. Connect Power BI to Azure:
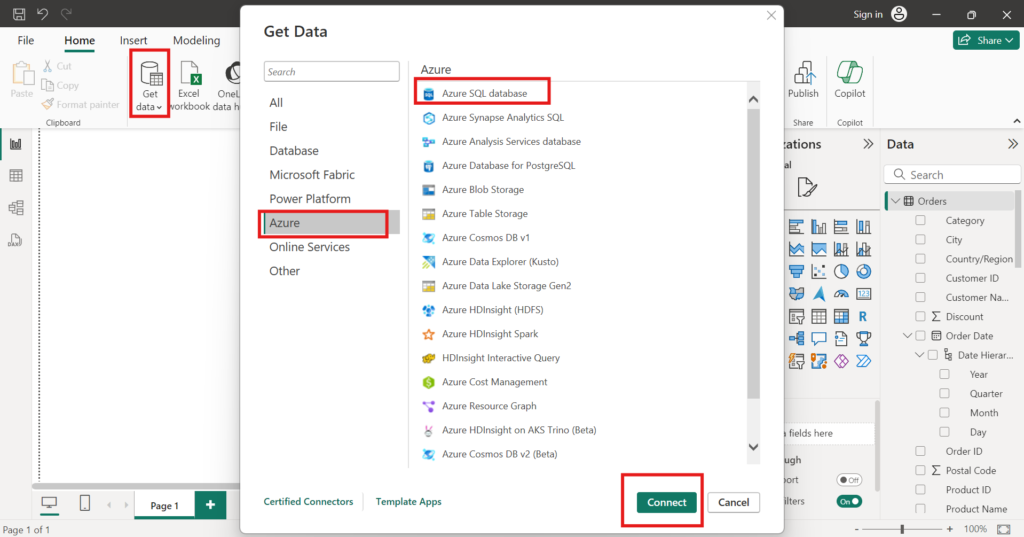
- Open Power BI Desktop
- Click “Get Data” and choose the Azure Service
- Enter the connection details and login details
- Load data into Power BI.
4. Shape and Show Data: Use Power BI’s features to shape, examine, and create visuals from your data.
3. Power BI – Microsoft 365 Integration
3.1 What is Microsoft 365?
This is a cloud-based platform for getting things done. Microsoft 365 is, at its core, the subscription-based service offered by Microsoft, wherein it provides a lot of tools to help one work and stay organized.
By using Microsoft 365, we can put the power of all the desktop applications—Word, Excel, PowerPoint, Outlook, OneNote, etc.—into motion with the flexibility of cloud services like OneDrive, Microsoft Teams, Exchange Online, SharePoint, and Yammer, all rolled into one comprehensive solution for productivity and collaboration.
3.2 Why we need Microsoft 365?
Microsoft 365 saves time with workflows that automate themselves and make working in tandem easier. It ensures you always have the most up-to-date Office apps from Microsoft. Also, provides a full set of productivity tools and services that enhance cooperation, communication, and work efficiency among people and businesses.
There are some key benefits offered by Microsoft 365:
- It provides cloud storage to store and access files safely from anywhere
- Having efficient collaboration Tools for Real-time Co-authoration and share through applications such as Word, Excel, and Teams
- Professional Email with Outlook and Teams for messaging and meetings.
- Built-in security features to keep your data and privacy safe.
- Provide the latest features and developments at no additional cost.
3.3 Why do we have to connect Microsoft 365 to Power BI?
Bringing together Power BI and Microsoft 365 gets you to the top of your business performance — all working seamlessly in one place.
• Instant Insight Access: Get the data insights you need directly within the Microsoft 365 products you use every day—no flipping between programs.
• Data Protection: Protect your data with Microsoft 365 security that holds up even when it is exported to other forms, including Excel or PDF
• Get Swift Solutions: If you are comfortable using Excel, then in most cases, you can easily learn to analyze real-time Power BI data and generate reports.
3.4 How to integrate Microsoft 365 to Power BI
There are some steps by which we can link Microsoft 365 to power BI
Firstly, please check whether you have installed the latest version of power bi desktop 2.68.5432.841.
• Besides, please check the steps below. Assuming that you want to connect data of shbytes@microsoft.com.
1. First of all, navigate to Get Data, expand More, then Online Service, and click Microsoft Exchange Online.
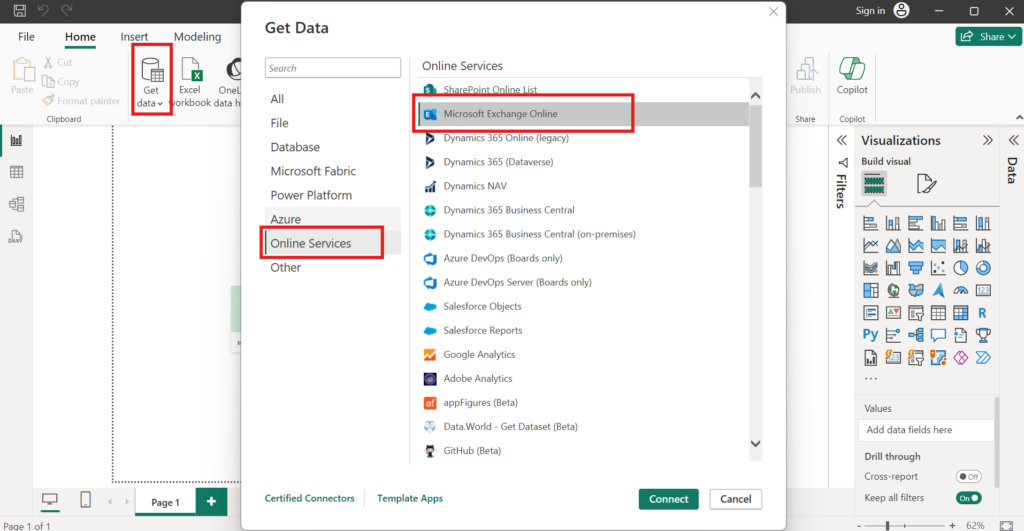
2. Type the mailbox address: shbytes@microsoft.com
3. Select the Microsoft account type
4. Sign in the shbytes@microsoft.com and enter password
5. Then you could see load the data
Make workflows easier and increase collaboration in Power BI
The workflow and collaboration in Power BI uses tools and features to simplify and improve the process of analyzing and reporting on data Teams can brainstorm, share, and collaborate on data about in real time with Power BI. This will enable improved decision-making through improved communication among team members, reducing time spent on data-driven tasks that should lead to improved productivity.
There are some tools that can integrate with Power BI for the same:
Integrating with Other Tools
1. Power BI-Microsoft Teams Integration
The Power BI personal app brings all the basic Power BI user experience to Microsoft Teams. You can publish your Power BI reports directly in Teams for easy access and collaboration between members.
1.1 Why integrate microsoft team to enable BI ?
Using the Power BI app in Microsoft Teams allows you to switch from Teams to Power BI. The app contains your experience with Power BI—the Power BI application lives in Microsoft Teams. Once installed, you can do almost everything in Microsoft Teams that you can do in the Power BI service.
- Create, maintain and edit dashboards, reports and apps.
- Create and install workspaces.
- Share content, via e-mail or through Microsoft Teams.
Also, the Power BI app in Teams has a feature that you won’t find when viewing the Power BI application on the web (app.powerbi.com). Basically, on the Power BI home page in Teams, you can see all the Power BI tabs you see in Teams.
1.2 How to integrate Microsoft team with Power BI ?
This integration can be a comprehensive and flexible way to embed insights from data into all collaborative practices in your organization. By following the steps below, we can integrate Power BI with Microsoft Teams.
Step 1: Prepare your Power BI Report
First create your power BI report you want to share. You can have Power BI on the desktop ready to publish to the power BI service.
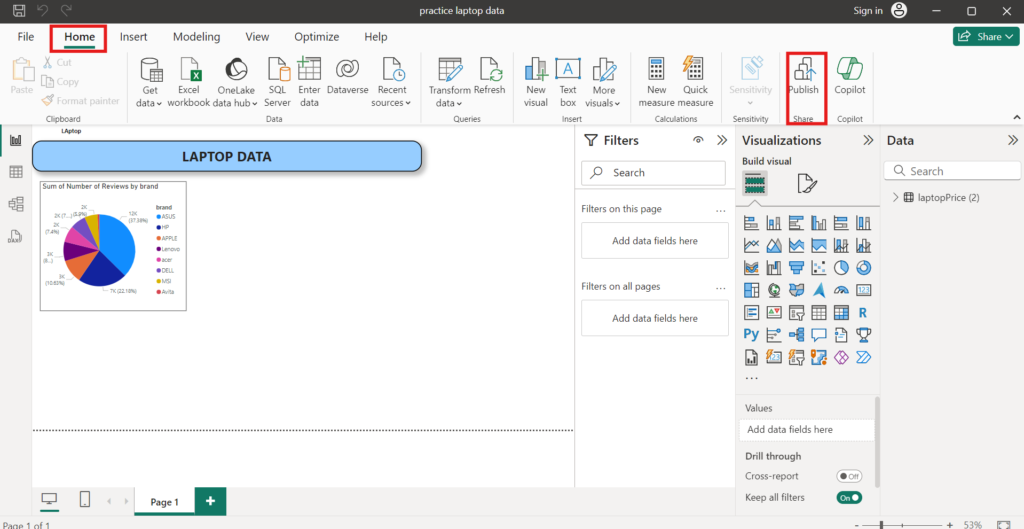
Step 2: Publish your report
Open your Power BI Desktop and publish your report by clicking the “Publish” button. And don’t forget to choose your workstation where you want to publish your reports to the Power BI service.
Step 3: Give Access to Microsoft Teams: Then open Microsoft Team via Microsoft Teams application or use it via your web browser.
Step 4: Add Power BI App to Teams: Go to the left sidebar of Teams, click on the “Apps” icon and type ‘Power BI ’ in the search bar. Once you click on the Power BI icon and click the “Add” button, the installation of Power BI into your Teams environment will start.
Step 5: Add Power BI Report to a Teams Channel: After installation go to the channel where you want to add your Power BI report. Click on the “+” icon (Add a tab) at the top of the channel to select it.
Then, select the Power BI app from the list of available applications. after that, select your report from the list of published reports that you want to add and click on “Save” button.
Step 6: Adjust the sharing settings: Check the permissions to who (from your team) must have permission to view the report with in Power BI. Make the settings accordingly.
Step 7: Engage and Collaborate: After permission now your team members can pin the specific report and you all are can make relevant discussion on it.
2. Power BI- Power Automate Integration
2.1. What is Powe Automate?
Power Automate also known as Microsoft Flow. It is a cloud-based service that permits users to create automated workflows between different applications and services. By letting users automate tasks and processes concerning their data in the context of Power BI it improves the capabilities of reporting and data visualization.
2.2. How to integrate Power Automate with Power BI ?
Integration of Power BI with Power Automate helps in process automation and improve the potential uses of Power BI reports and dashboards. To integrate Power BI into Power Automate we must follow these steps:
Step 1: Ensure Requirements: Before you get started, be sure that you have the following:
- Access both to Power BI and to Power Automate
- The permissions to create flows and leverage Power BI services
- Power BI dataset and report ready for automation
Step 2: Sign In to Power Automate: Open Power Automate in a browser https://flow.microsoft.com and Log in using your organizational account that has Power BI.
Step 3: Create a New Flow: To create a new flow, click on “Create” from the left-hand menu. Then, Select the type of flow, such as Automated, Instant, or Scheduled, which we want to create.
Automated Flow: This flow will be run by some event. For example, Power BI receiving data.
Instant Flow: This flow will run manually.
Scheduled Flow: This flow will run at regular intervals.
Step 4: Trigger selection: Based on the flow type we selected, choose the appropriate trigger.
For example, when a data driven alert is triggered: This trigger can be chosen to notify you when some condition is met in the Power BI service.
We can go to Power BI by search in trigger list and choose the settings of trigger as per our requirements.

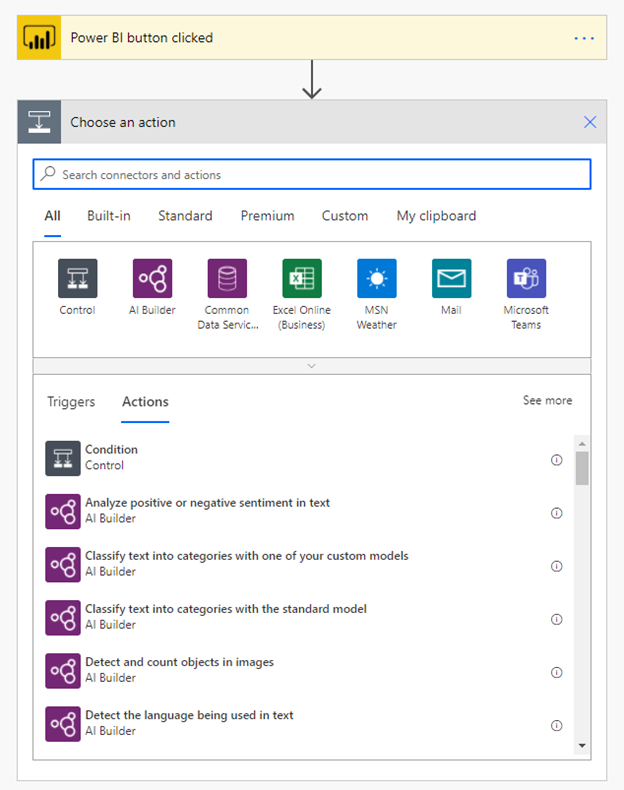
Step 5: Add Actions: After configured the trigger, you can add actions by going to “New step”. You must explore Power BI actions using the following, among others:
- Add rows to a data structure—Push the flow data into a Power BI data structure.
- Update a data set—Automatically update your data set in Power BI. Select the action you want to perform and then configure the action plan, for example select workspace and data set.
Step 6: New Actions: As per our demand, you can add more actions from other contacts, what you want our workflow to do—like, send notifications in Outlook or update SharePoint lists.
Step 7: Test the Flow : Once you have configured the flow, save it. If possible, run the flow by hand. Alternatively, wait for the trigger event. Review running history for any successes or failures and perform troubleshooting as necessary.
3. Power BI- SharePoint Integration
Modern businesses go on to collect huge amounts of data on their SharePoint Online lists. However, this data only makes sense once they can analyze this data using Power BI or any business intelligence tools. Now, to analyze this data, it becomes imperative that we integrate your SharePoint online with Power BI.
3.1 What is SharePoint ?
SharePoint is Microsoft-developed to create an internal website or team sites where coworkers can collaborate, store documents, etc. We can also create site collections which have different websites and subsites and allow our team members to work on a site and collaborate without any hassle. One of the most powerful features of SharePoint is Collaboration.

The following are the prerequisites to transfer data from SharePoint into Power BI:
- SharePoint License
- SharePoint List or Library
- Power BI Desktop app
3.2 How to integrate SharePoint with Power BI ?
Steps to get data into Power BI from the SharePoint library or list and embed data in the Power BI report:
We have SharePoint document libraries, folders, and documents from where you can transfer the data into Power BI.
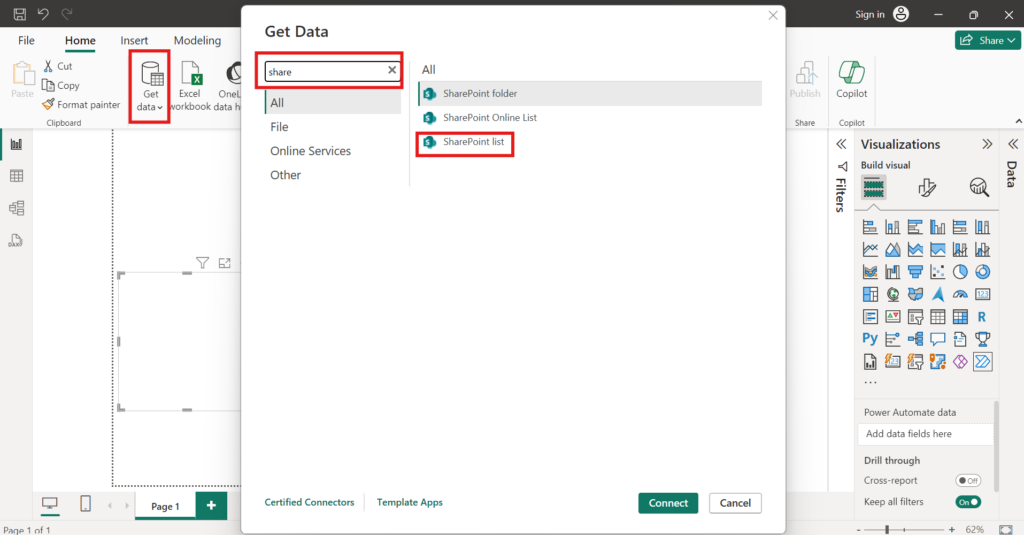
- The first is to download the Power BI Desktop Application. Under this, at the Home Tab, we have the “Get Data” tab. There are several options within this dropdown menu.
- Click on the “More” button from the dropdown menu. The Get Data dialog box then appears in the search bar. Search for SharePoint and three options will appear:
- You can choose one option for accessing the data, which can be listed as ‘SharePoint List”
4. Then click on “Connect” at the right bottom of the dialog box.
5. Another dialog box appears with the click on “connect”. In the dialog box, type in the SharePoint site URL, to fetch the list/library and click ‘Ok’ to connect.
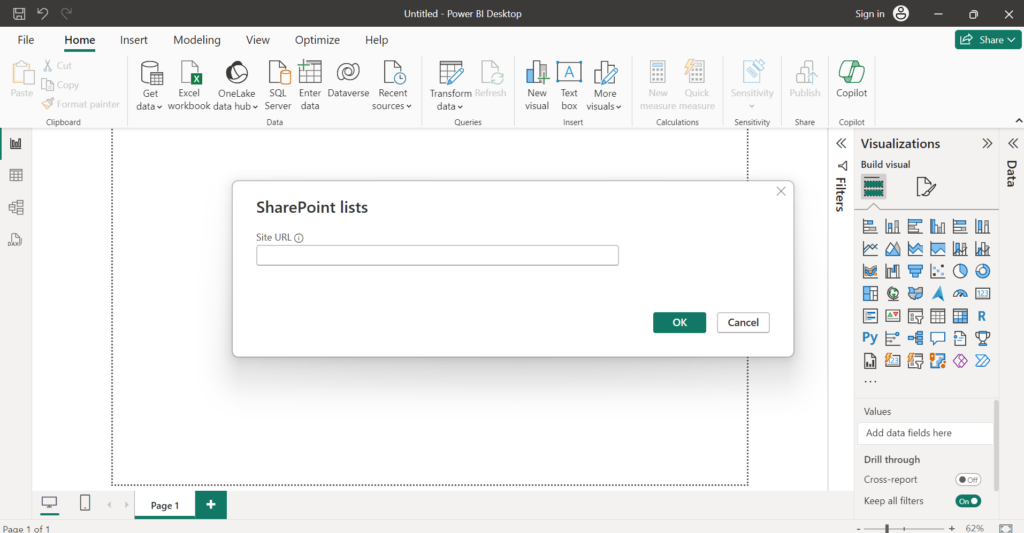
6. Now, provide your SharePoint site credentials and allow access to the SharePoint site by clicking ‘connect’.
7. In the left-side Navigator menu, select the check box beside the SharePoint list that you want to connect.
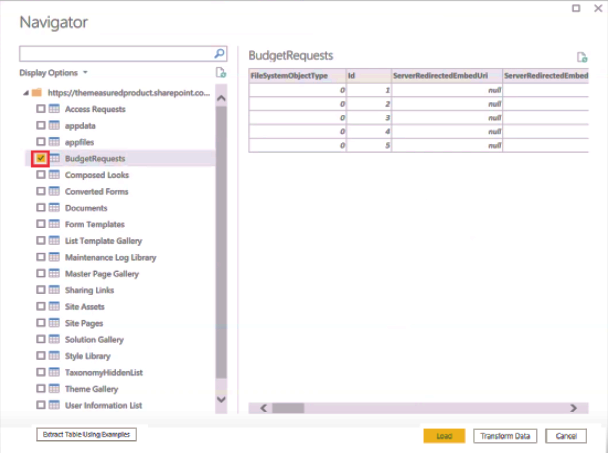
8. Click ‘Load’ to load the data into Power BI Desktop. Once your SharePoint data is loaded, you can use it to build a report on Power BI.