
Introduction
Power BI Service is a cloud business analytics service from Microsoft. This service allows users to transform raw data into interactive dashboards and reports to analyze and visualize data in real time. It equipped to provide its users with data visualization, sharing of insights, and collaboration across organization.

The Power BI Service complements Power BI Desktop, which is a powerful application for building and designing reports and dashboards on a local machine. Again, while Power BI Desktop is meant mainly for report authors, Power BI Service is for end-users who need to share, collaborate, and consume those reports online. It can be accessed either through a web browser or mobile app, thereby making it pretty accessible for users while on the move. It also embeds and interactively brings AI-based automatic insights and compelling visualizations that bring data, big and small to life.
Sign up for the Power BI service
To Use the ultimate features of Power BI Service, you need to have a Power BI Pro or Premium Per User (PPU) license to create content in Power BI.
If you do not have a Power BI account, and want to create some content, sign up for a free Power BI Premium Per User 60 day trial before getting started. Finish the wizard to get your free license. Open the Power BI service (app.powerbi.com), and click the Me icon. Premium Per User – Start trial or Buy Fabric now.
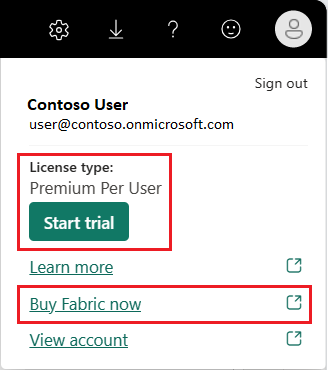
Once you select for start trial or buy Fabric now , you will move to next page to fill up the details, once you done with the details your Power BI Service account has been created.

Key Features of Power BI service
When you talk about Power BI service, it is work with various components together. In Power BI service you will see, how these components are work together, and how you might work with them.
For example, when working as a designer or creator, one common workflow will be to begin in Power BI Desktop, where you will create content like reports, apps, and dataflows. Sharing the following content to Power BI service workspaces shares the content with colleagues. You and your colleagues continue to edit and add to content in the Power BI service by sharing it with others.
Power BI service is powerful enough to render data visualization, sharing of insights, and collaborating between organizations for its users. Some of the key features of Power BI Service are listed below:
A. Creating Dashboard in Power BI Service
By using Power Bi service is an another alternative method to create a Power BI dashboard with the help of using the following steps.
1. Access to Power BI Service account – First create and open your Power BI service account(app.powerbi.com) by using your work place or school email Id.
2. Import or connect your data –On Power BI Service Home page, upload your data by click on get data followed by select files, Databases or any other source of data according to your dataset. Than import or link to a data set.
If you have published a dataset directly from Power BI Desktop already, then you can skip this step.
3. Add data to create a report– Once you upload your data. Open Power BI service using a browser app.powerbi.com Select My workspace in the navigation pane.
Select New> Semantic model to begin importing. Add data to begin building a report page opens.
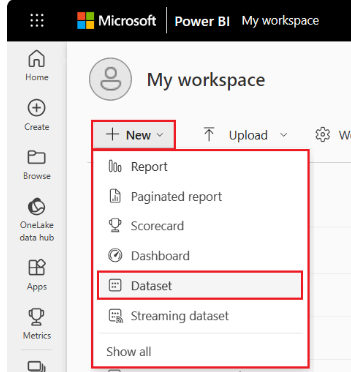
3. Add data to create a report– Once you upload your data. Open Power BI service using a browser app.powerbi.com Select My workspace in the navigation pane.
Select New> Semantic model to begin importing. Add data to begin building a report page opens.
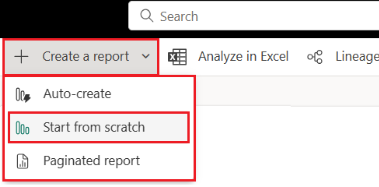
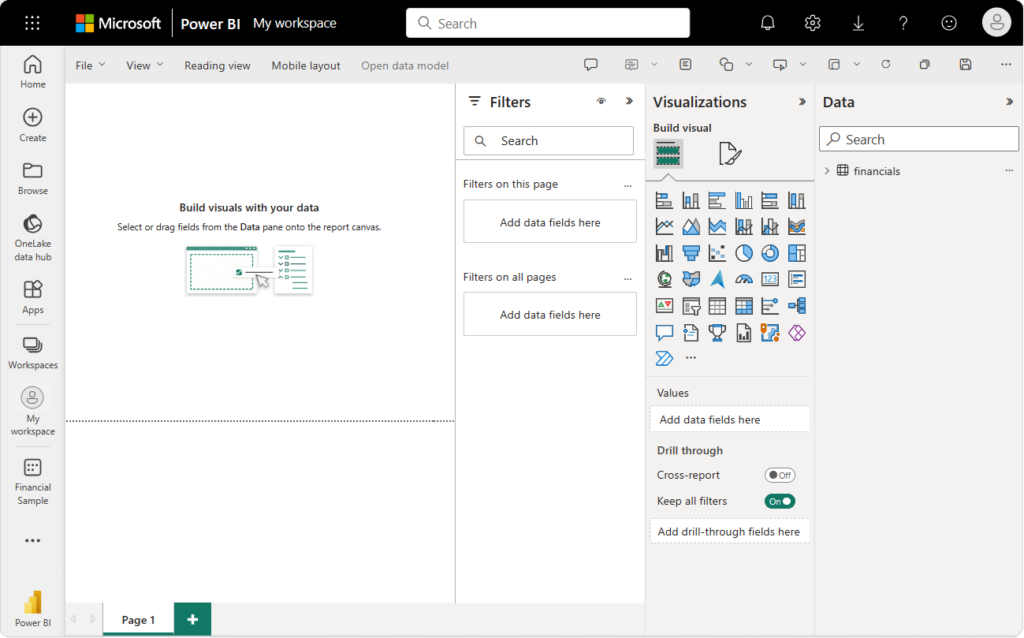
4.Build a report-The new report opens in My workspace in the Power BI service. You will see the blank report canvas is blank, holds the Filters, Visualizations, and Data panes
After attaching data to build a report you can start exploring. If you find something of interest you can save it on the report canvas. You can then pin the item to a dashboard in order to view the data for changes over time.
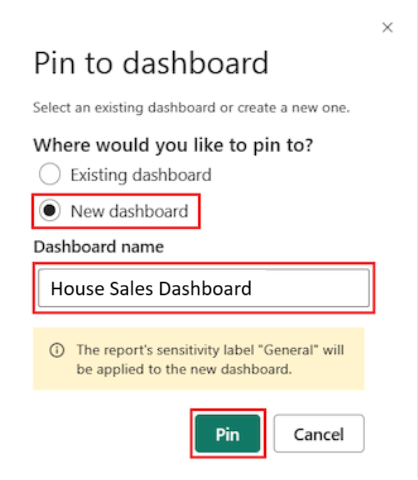
5. Create a New Dashboard – Once your report has done, Power BI will save the report to the selected location. The default is My workspace. Power BI will then open the report in Reading view. Then, Move the mouse over the visual and click again on the icon, Pin. The dialog, Pin to dashboard will open.
In the popup dialog, click ‘New dashboard’ and enter the name of the dashboard, for example, House sales dashboard. Click ‘Pin’.
After that one massage dialog get open. click on ‘Go to Dashboard’.
6. Add Tiles to Your Dashboard– There is also an option to add tile at the top of your dashboard. Many tile types are available- web content, text box, image and many more.
You can create and pin the tile through prompts.

7. Explore visualizations with Q&A – The Q&A question box can be found in two places within the Power BI service:
a. Dashboard tile view: In the top left corner of the view screen, you will see the Ask a question about your data Q&A box. Screenshot showing the Q&A question box in the dashboard tile view.
b. In the report editor the box where you ask your question is located in the top menu bar: Ask a question Q&A


source: https://learn.microsoft.com/en-us/power-bi/fundamentals/service-get-started
Upon clicking the Q&A box, Power BI opens an extended view to help you in asking questions and finding answers.
b. Data Refresh and Scheduling
In working with Power BI, one needs to make sure that their datasets are refreshed. Some configurations on data refresh can be configured to include automatic refreshing schedules as well. Additionally, one should look out for any issue that may pop up while performing the refresh. By follow these step you can configure on data refresh and automate the scheduling.
Configuring Data Refresh in Power BI Service
- Publish your report to Access to Manage -Before you go through data refresh settings first ensure your Power BI report or dataset is published to the Power BI Service.
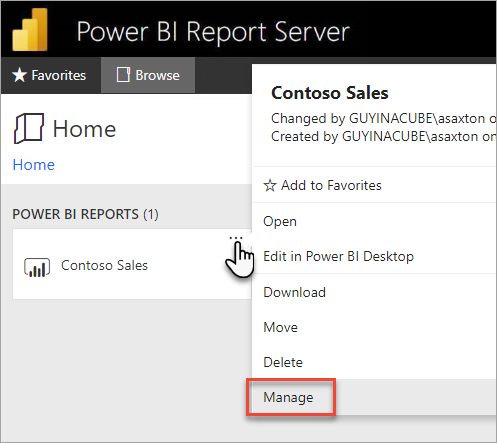
Then, Sign in to Power BI Service at https://app.powerbi.com. Go to your workspace. Find the dataset you want to set up for refresh settings.
Click on the three vertical dots (…) that appear next to the dataset and click on ‘Manage’.
source: https://learn.microsoft.com/en-us/power-bi/report-server/configure-scheduled-refresh#configure-data-source-credentials
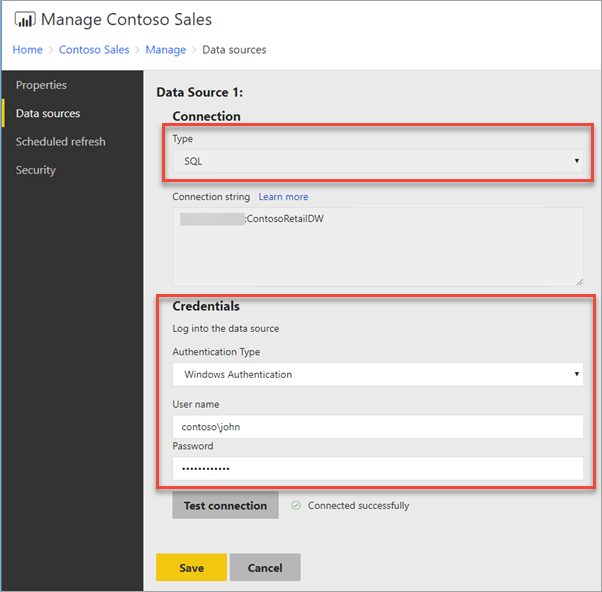
2. Edit Data Source Credentials – In the section Data source credentials provide the credentials which your report is using for its data sources.
Click Edit credentials and walk through the prompts to add the correct authentications
source: https://learn.microsoft.com/en-us/power-bi/report-server/configure-scheduled-refresh#configure-data-source-credentials
3. Configure Refresh: Under Dataset settings you will find the Scheduled refresh. Toggle on Keep data updated.
Select the refresh frequency as being either Daily, Weekly, or Multiple times a day.
Specify times that you want the refresh to occur. Be cognizant of time zones.
Note: Under the section Failure Notification you can enable alert where refresh fails. Provide email address and also don’t forget to save your settings after you have configured everything.
2. Edit Data Source Credentials – In the section Data source credentials provide the credentials which your report is using for its data sources. Click Edit credentials and walk through the prompts to add the correct authentications. Scheduling Automatic Refresh.
Scheduling Automatic Refresh
If you want to setup refreshes several time. Power BI offers for Pro users up to eight refreshes per day, whereas Premium users get up to 48 refreshes per day.
You can set times at which you would like the refresh to take place.
Important Note: Note that the Schedule takes into account the time zone setting. When you are scheduling, it will use the time zone for the Power BI Service.
Limitations: Some of the live connections or Direct Query sources may be restricted in terms of refresh of data.
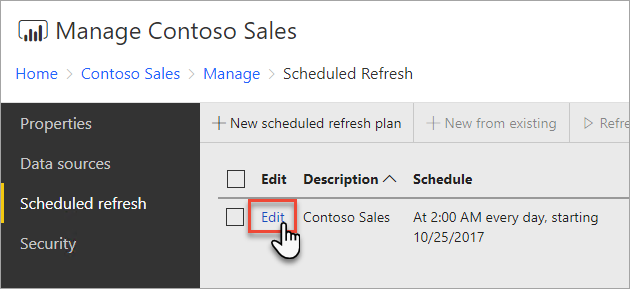
Modifying a Schedule Refresh Plan
It is almost the same as creating one.
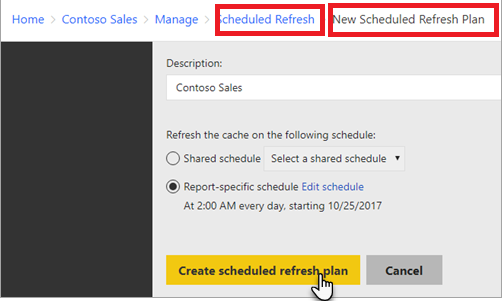
1. You right-click over the Power BI report in the web portal and click the Manage option.
2. In the left menu, you click the Scheduled refresh tab.
3. On the Scheduled refresh page, you hover over the refresh plan you would like to manage and then click Edit next to it
4. On the Edit Scheduled Refresh Plan page, you write a description and select a schedule to execute when you’d like your data model refreshed.
5. Click Apply.

Source: https://learn.microsoft.com/en-us/power-bi/report-server/configure-scheduled-refresh
Note: If you want to see the current status about refreshed page update. You need to refresh the web page to see the current status because status will not change by itself.
C. Power BI Q&A
Power BI Q&A is the powerful tool provided by Microsoft to enables interaction between user and data by asking questions posed in natural language through user. This interactive tools allow the simplest of users to ask such questions in plain English and get instant visualizations and insights related to their data.
Using Power BI Q&A
When you just need to ask your question in your natural language to get answer from your data, so you must say it is the fastest way to resolve your queries. Here, The Q&A features in Power BI let you explore your data in your own words by using natural language. You can Power BI Q& A for free, it is available for all users.
Go to Power BI Q & A
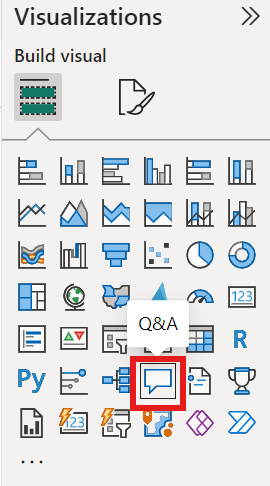
To ask questions about your queries related to your data first your upload your data in Power BI.
Once data is upload, you can select the Q & A visual from visualization pane.
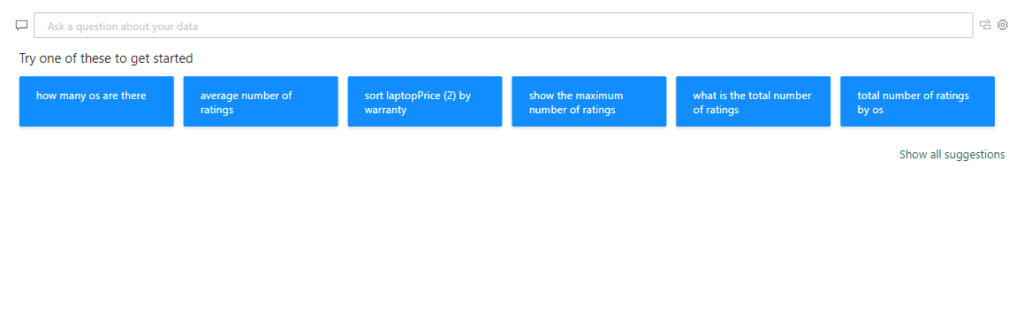
When you click on it one display will open on dashboard as depicted in below diagram.
Here you can type question regarding your data and you will see some relevant questions related to data is already available.
Customize Q&A Experiences
To make the experience more engaging with the report for your user you can customize the Q&A experience with the help of following things:
Synonyms and Phrasing: You can configure synonyms for your data fields, which helps Power BI understand how users might be phrasing queries differently.
Q&A Tools: One can customize the Q&A view in a Power BI report to determine which datasets connect to it and to employ styling options that would be suitable for a given theme of a report.
Learn from Usage: Power BI learns from usage to understand the basis of repeated queries and patterns.
d. Dataflows in Power BI
Dataflows are a feature in data management and business intelligence that has actually simplified and streamlined the processes related to preparation and transformation. In other words, they act as a centralized mechanism for data preparation that centralizes improvement of efficiency and consistency regarding data usage across several reports and dashboards.
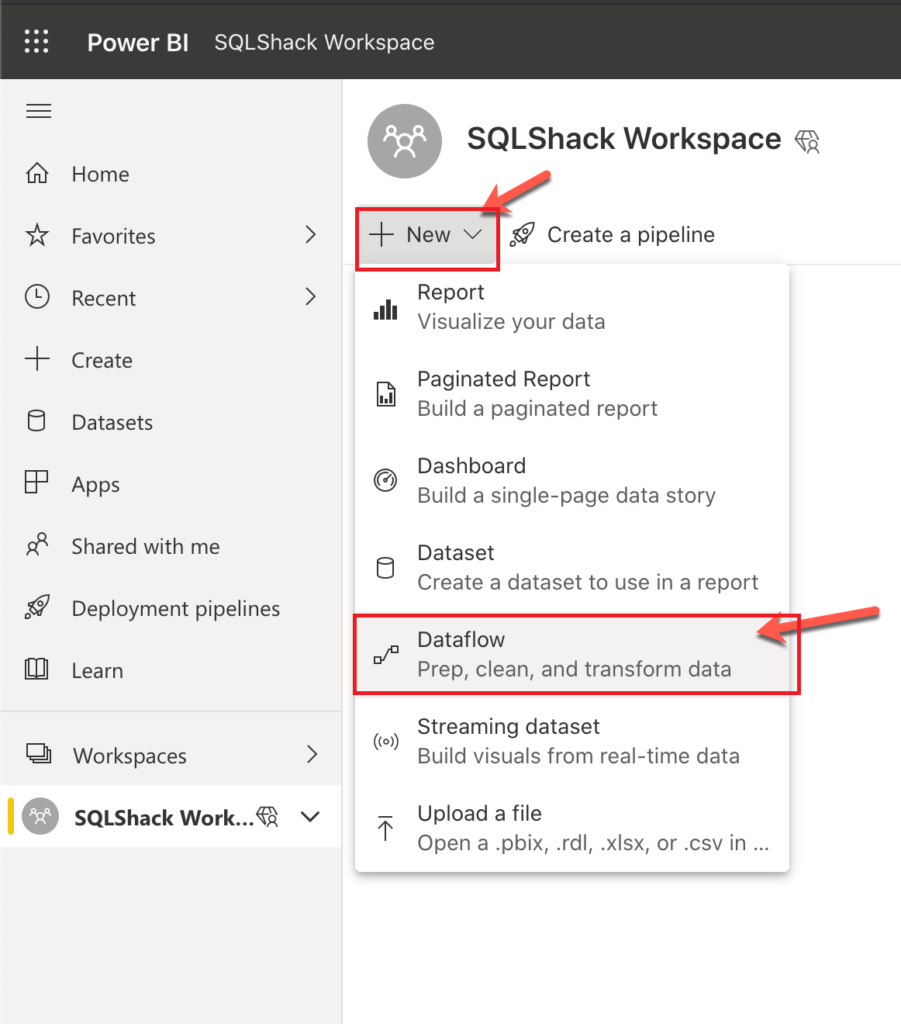
To build a data flow in Power BI Service, follow these steps:.
Step 1:Login to Power BI Service – First step for creating dataflow is to access Power BI then sign into your organizational account.
Step 2: Select workspace – Choose a workspace for building the dataflow; this appears on the sidebar.
Note: To create a dataflow, you will need to have permission to do so in your selected workspace.
Step 3: Create Dataflow- Click on ‘New’ present on top right corner your chosen workspace. Now, select ‘Dataflow’ from the list that will appear in the drop-down menu.
Source: https://www.sqlshack.com/an-introduction-to-power-bi-dataflows/
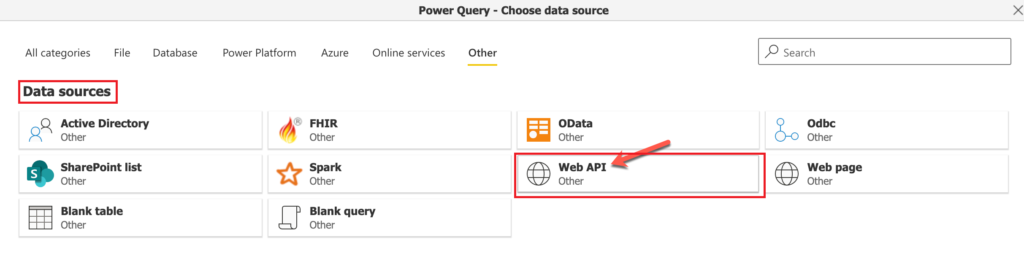
Step 4: Choose dataflow type – Sometimes you might be prompted to select an Add new tables and Use an existing table. To take the Add new tables option requires that you specify a new dataflow.
For example – Here we select Web API File format from Data sources in Other tab. Of course, that is just another demo web API.
Source: https://www.sqlshack.com/an-introduction-to-power-bi-dataflows/
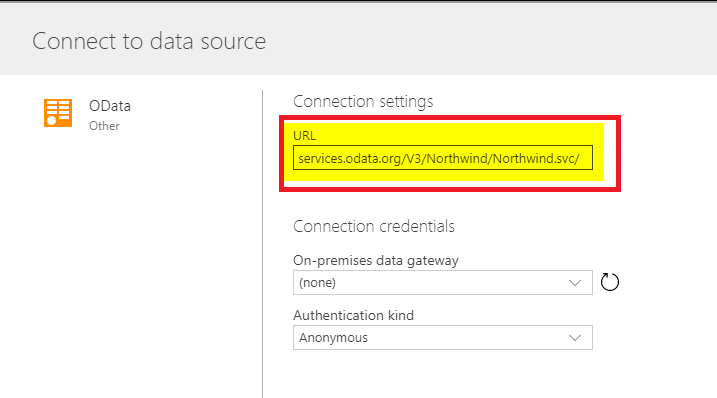
Step 5: Connect to Data Sources – Select one of the data source types listed (SQL Server, SharePoint, Azure, etc.).
Enter the required connection details such as the server name, database name, and so on, depending on the data source you’ve chosen and proceed for connection.
For example- Here, we select OData as the type of data source, provide the URL and click on next to proceed.
Source – https://radacad.com/getting-started-with-dataflow-in-power-bi-part-2-of-dataflow-series
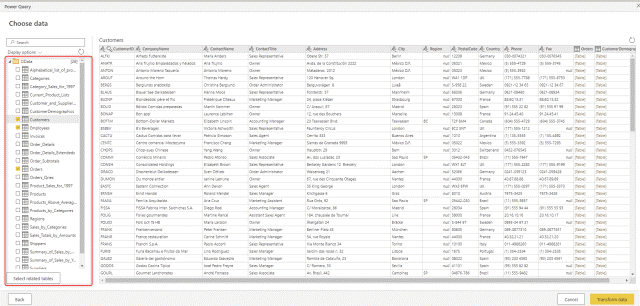
Upon the end of this step, you should see a window which looks pretty much the same as Navigator in Power Query. Here, you’ll find a whole list of tables and start to get familiarized with them.
Source – https://radacad.com/getting-started-with-dataflow-in-power-bi-part-2-of-dataflow-series
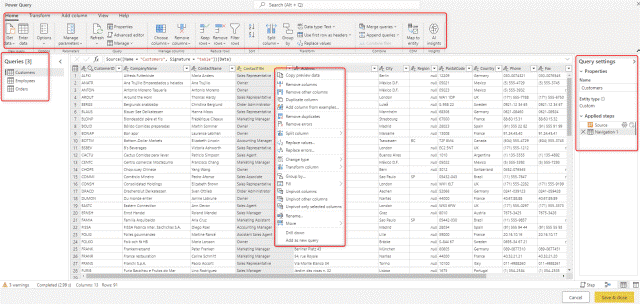
Step 6: Transforming Data using Power Query – After connecting, you will be taken to the Power Query Online editor.
Here, you can perform transformations like filtering rows, changing data types, merge queries, etc.
Use ribbon options in Power Query to edit your data transformations as needed.
Source – https://radacad.com/getting-started-with-dataflow-in-power-bi-part-2-of-dataflow-series
Step 7: Configure Dataflow Settings – Once you have made all the necessary transformations, you will need to name every table that you Saving the Dataflow create. Make sure that the table names are descriptive of what they contain.
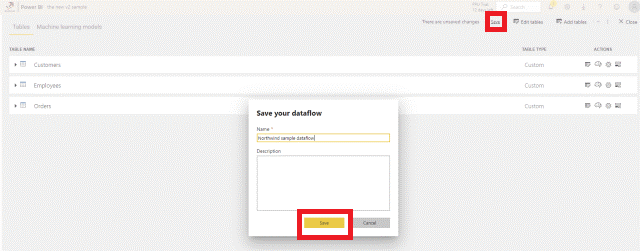
Step 8: Save Dataflow – After having set up your data flow and changed your data, you go to the top left of the Power Query interface to click the ‘Save’ button.
Than Name your data flow with a relevant name and description. And click on ‘save’ button to save your Dataflow.
Source – https://radacad.com/getting-started-with-dataflow-in-power-bi-part-2-of-dataflow-series